
How can the beginner, the expert and the pro absolutely get the most out of Microsoft Office 365 calendar on their mobile device (and their PC or laptop)?
There is no way anyone can remember everything they have to do in the average working day. You’ve got to deal with meetings, deadlines, To Do lists, reminders, warnings and unexpected emergency gatherings. Few people enjoy that sudden sinking feeling when they have this vague memory that they’re not supposed to be stuck in this traffic – they’re supposed to be across town in a meeting, likely wrestling entirely different traffic but unlikely to be at least an hour late. This is made significantly worse when you realise that you can’t check your calendar because it isn’t synced to your mobile device. Or even set up.
This used to be a problem for those who used both Google and Microsoft Outlook calendars – the two platforms weren’t easily compatible without extensive workarounds and syncing was almost completely out of the question, but not anymore. As Android is the most popular mobile operating system and Microsoft Outlook one of the most popular business calendar there has been work done on both sides to ensure that the two platforms work together a bit more efficiently.
With these tips you will master Microsoft Outlook 365 on your mobile device and change ‘Oh dear goodness no!” into “Nearly there, just parking…”
The starting point
The first step is to download the Microsoft Outlook app to your Android device. With this app you can not only add multiple accounts but you can also add multiple calendars which will allow you to see all your appointments – those on both Google and Microsoft – simultaneously. Also, ensure that your Microsoft Outlook account is registered – you can do so here.
When you first install the app, it will ask you if you would like to link your accounts. Select this option to ensure that your calendars are synced. It is worth noting that this is a far more effective way of adding a Microsoft account to your Android device as the Android app sometimes doesn’t allow for you to do so. A sneak tip to getting your appointments to sync across both calendars is to send yourself an invitation – instead of following the usual method of adding an event/item to your calendar, send yourself a meeting invite. This then appears in your calendars across all devices. You don’t even need to click Accept. It’s a clever hack that basically orders your accounts to pay attention to one another.
Take a shortcut
Want to get the most out of your Microsoft Office 365 app? When you’re working online, you can use some very nifty keyboard shortcuts that will allow you to manage tasks quickly. You will also find these shortcuts very helpful for when you have to do repetitive tasks and don’t fancy losing your mind at the same time. This is especially helpful when you’re first setting up your Android device and organising your calendar using your PC or laptop. The best are:
- Alt / 1 – show one day
- Alt / 6 – show a week with every day next to one another
- Ctrl / A.t / 5 – schedule view (only in certain versions of Outlook)
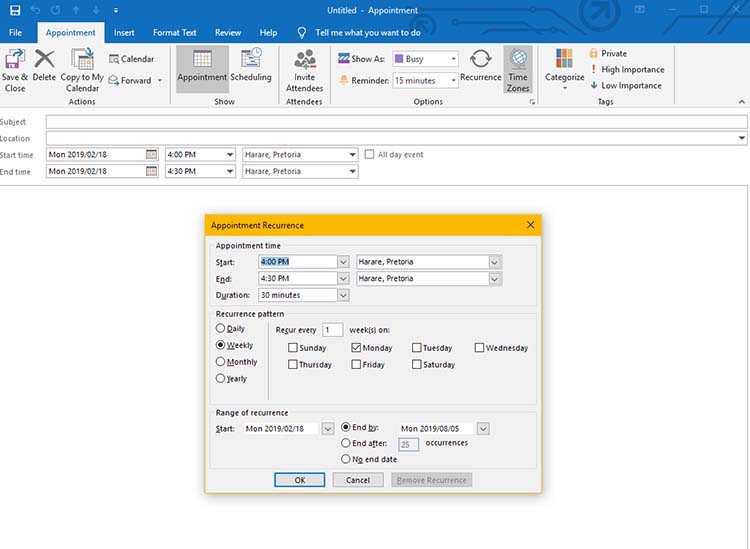
- Ctrl /G – create a recurring appointment
- Add days, weeks, months or years to an appointment by simply typing the number followed by the letter i.e. four days would be 4d and four years would be 4y. Ensure you have highlighted the copy in the date bar, write the numeral and letter, press enter, and the date will automatically adjust
Realtime sync
Finally, you will want to ensure that your sync is working properly and, for business users, that your business calendar is synced with your Google calendar on your device. Sometimes, this isn’t an option with the Microsoft Outlook app and troubleshooting isn’t fun when you’re busy.
On your Android device, go to your Settings tab. Ensure you are not in your Gmail settings. Scroll down to the tab that says Exchange, select your Outlook account, ensure that every box is ticked, then select Sync Now at the bottom of the screen.
Double check you are receiving your reminders by going to your Calendar, it should now reflect all the reminders you’ve set up. This should apply across both Gmail and Microsoft Outlook calendars. If it doesn’t show, restart your device and try again. Sometimes all you really do need to do is turn it on and off again.
This entire process should have now transformed your Android device into an Outlook calendar powerhouse with every appointment now reflected across all your different devices and platforms. However, as with anything, there could be problems so here are two troubleshooting tips to hopefully resolve any issues you may encounter on your way to making your life a little bit easier.
Troubleshoot 01: Ensure your Android operating system has the latest update. These differ from phone to phone so head over to your device manufacturer’s website to check your updates and install them. If you have anything less than Nougat, you’re probably going to run into problems. Do the same for your Gmail app and your Outlook app.
Troubleshoot 02: Having trouble with your password on Exchange set-up? If you used multi-factor authentication then your user password is not the same as your account setup password. You need to generate an application password when you are setting up your new Exchange account. Do so by going to your account preferences in Microsoft Office 365 – log in, go to My Account, select Security & Privacy, select Additional security verification, select Create and manage app passwords, click on Create and then copy the code that is then generated. Now use this password as your user password and see if it stops your login issues.