How the beginner, the expert and the pro can absolutely get the most out of Microsoft Excel while using their Android device
Microsoft Excel is like Marmite – you either love it or you hate it. For those that love it, Microsoft Excel is this delectable smorgasbord of cells, data, easy formulas, quick calculations and cool tables. For those who don’t, this tutorial will not only reveal some of the secret spaces hidden within the wondrous folds of Excel, but it will get you started on the path to, if not liking, at least respecting this clever slice of software.
Your first step is to download the app from Google Play. The app is free to download and install but it does include in-app purchases that vary in price from as little as R11.24 to R119. What you pay for will entirely depend on your Excel usage and requirements but it is worth considering purchasing Microsoft Office 365 as a bundle as you get all the extras along with ongoing access across devices and platforms.
The starting point
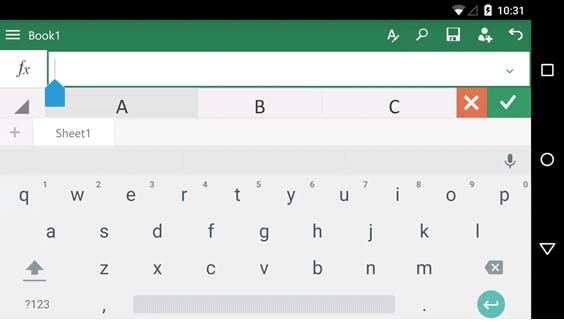
The first step is to get a feel for the app. It’s tap-based, so accessing cells and getting information into cells takes a bit of getting used to, especially if you’re familiar with the desktop version. The following taps will get you where you need to go:
- Double tap – do this in a cell to access it, then you can type in your text. You can also use double tap on a cell to gain access to the blue cursor – this can be dragged and dropped to any cell where you want to make changes.
- Tap the green check – when you are finished entering information into a cell, tap the green tick box to save.
- Tap and hold – delete text by holding down after tapping on a cell and then selecting Clear.
- Tap the blue cursor – this can be found through a single tap or a double tap on a cell. Tap on this cursor to create a new line.
- Tap on this link – this will take you to the Microsoft Office official guide to Excel for Android and the different taps and touches.
It’s all about the image
Yes, you can put images directly into Excel using your camera. It’s as simple as taking your freshly forged tapping skills to the cell where you would like your image to appear, tapping on the cell, tapping the Insert option on the drop-down menu, then Pictures, and then Camera. Take your picture (you look amazing) and select OK. This will now see your image appear in the cell where you wanted it. You can then tap on the Picture tab to edit and adjust your image, using the various resizing and style and effect tools to add some flair or remove any issues.
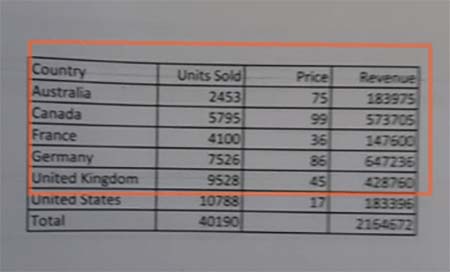
If you would rather that your use of photography in Excel go beyond useful and into extremely cool, then you can now use the brand, shiny, spanking new Insert Data from Picture feature. The name may need work but the feature itself is pretty spectacular. Released recently into Beta, the feature is only available to Office 365 subscribers and it allows you to take a photo of any image that has table-like contents and transform into a table. To use the feature, simply tap the Insert data from picture button, zoom in on the image you would like to turn into a table, and then hit the photo button. Using a combination of artificial intelligence (AI) and Excel’s excellent capabilities, the image will become a workable table. You can watch the official video right here.
If you would like to turn this idea on its head, you can also turn your data into an image by simply selecting the data, tapping Copy in the drop-down menu, and then tapping on Picture when you paste into the cell you would like to move the information to. Simply press and hold the cell where you want the information to go and the drop-down menu will help you do the rest.
Simply the best
Finally, if you are keen on dragging your data around in Excel, transforming cells and generally just turning your Excel into a helpful accessory, here is a top five list of epic tips just for you…
- Draw – Select the Draw feature from the menu, opt into the colour and thickness you’d like for your virtual ‘pen’ and tap the spreadsheet. Now you can swipe and move and swirl around the data to your heart’s content.
- Comment – tap on the cell you would like to use for your comments, tap the Insert button and then Comment, enter your text and select a clear area of the worksheet to finish it off. If you want to view your comments, simply tap on the comment icon on the top right.
- Search – tap on the lightbulb icon and enter your search information. The app will do more than just show you the answer, in some instances it will do it for you. Try italicising your text using search…
- Sum – you can auto sum your numbers by – select the cell below your last added values, select Home and then Auto Sum, and you’re done – you have set up your values!