
Microsoft OneNote for Android is actually a tidy set of features that allow you plenty of room to wriggle
Microsoft OneNote is a remarkably tidy tool for the Android device user. Not only has the platform received some nods of approval from critics, but it allows for you to really dig into note taking as a useful life and work tool. You can use it to quickly snap notes on the go, create sticky notes, and generally colour-code your brilliance as you go.
While there are some features missing in the Android version as compared with the original, it is still very useful for people who like to keep their life organised and carried with them wherever they go.
 Tasty starter tips
Your first simple step is to download the free Android app from Google Play right here. Once it is downloaded, you’re going to need a Microsoft account to get your OneNote working. You can set one up, completely free, by going to the Microsoft website right here or you can use your Microsoft 365 login that will allow you the same level of access.
Once you’re signed in, you’re ready to go. OneNote is not a hugely complex platform and does exactly what it says on the tin – takes notes. But what if you’re in a meeting and you urgently need to take notes? You can kick your OneNote into gear without having to scroll through your phone to find the app.
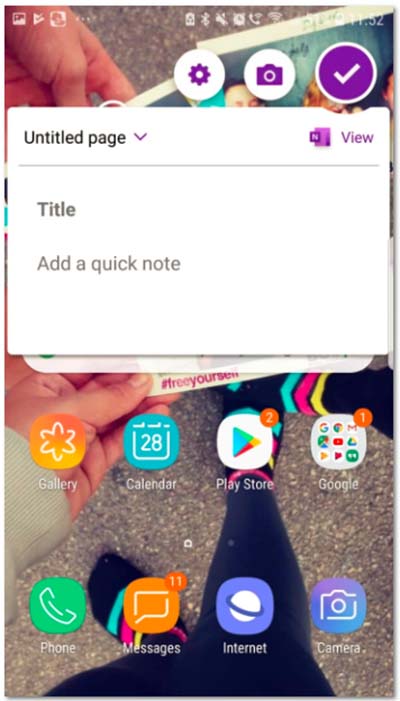
To set it up, open the app, tap on the three dots in the top right-hand corner, then tap on Start badge. A small OneNote icon will now appear on the screen. You can close down OneNote and the badge will float on the sides of your phone screen, ready for you to use.
When you need it, just tap on the button and you will immediately get access to an untitled page that will allow you to add a quick note, record a video or take photos, or adjust your OneNote settings. Instantly.
Sync and share
OneNote allows you to share all your notes across platforms and devices. It’s relatively easy to get it to work, but you may need some time to get things set up.
Your first step is to go to your Notebooks – these can be found on the homescreen when you open OneNote or by tapping on the Notebook item in the bottom left-hand corner. Then tap on More Notebooks and on the + Add your work or education account for more notebooks.
When you tap on this you will then be asked to sign into your Microsoft 365 account where you can then sync your Android device with your OneNote files in the cloud.
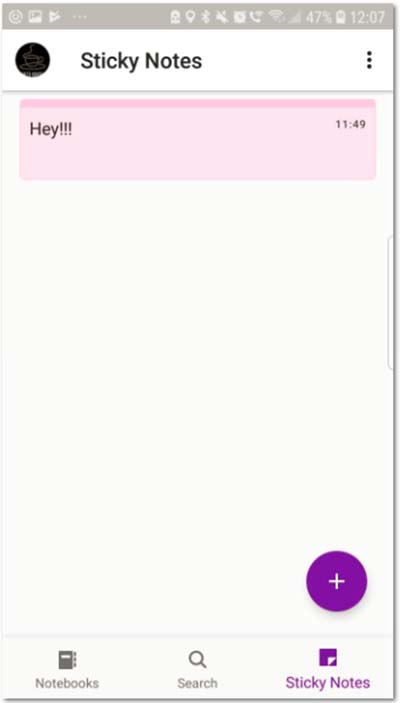
You can also share your sticky notes with other people across multiple platforms – they don’t need a Microsoft account to receive the notes either. You simply tap on the sticky note you want to share, then you tap on the three dots on the top right-hand side of the screen and then on the Share button.
This will open up options that range from social media platforms loaded on your device (like Whatsapp and Facebook) to email, gmail, and OneDrive.
The options provided will entirely depend on what you already have loaded on your device. A neat tip for sticky notes is that you can set them to appear anywhere across multiple accounts so a reminder on your mobile device will also appear in your email.
You need only ensure that all the systems are signed in to the same Microsoft account, and your sticky notes will stay synced. There is even a website dedicated to sticky notes – just go to https://www.onenote.com/stickynotes, sign in, and view them all right there.
 Now you can find it
In April this year, Microsoft released an update for OneNote that allows you to now search through all of your sticky notes and notebooks to find specific information.
In the past, you’d have to sift through the content manually but now you just tap on the search icon at the bottom of the screen, type in the start of a word, and poof, all the content – notebooks and sticky notes – that you’ve created with that keyword will appear. It’s a neat feature that addresses some of the limitations that the Android version of OneNote has.
Another nifty trick that OneNote allows you to do is to record audio directly into your notes. Tap on your notebook, on New Note or on a sticky note, then tap on the microphone icon in the pop-up keyboard.
When you first use this feature, the app will ask permission to access the phone microphone, tap Allow, then the app will immediately start recording. It’s saved directly into your notebook and can be accessed or shared at any time. Don’t forget to save it under a clear keyword so you can use the search to find it again later.