
This is how to get the most from Outlook for Android.
Microsoft Outlook is an incredibly useful tool that allows for the user to get an in-depth communication and collaboration experience with some neat options for calendar, appointments and overall email management.
For those who enjoy Outlook on their PCs or who have access to Microsoft 365’s Outlook platform, and who may not want to use another email solution with their Android phone, this is a really well engineered solution. So much so, that it doesn’t feel like a Microsoft app tacked onto an Android platform.
And, thanks to this neat app (download it right here), anyone can pop Microsoft Outlook onto their Android device and take advantage of its myriad features. It’s designed to work seamlessly across all your different platforms, so Outlook on your PC will connect with Outlook on your phone, tablet and any other mobile platform.
There are some really great features connected to this app and it can make managing your calendars fabulously simple, but in this article we’re focusing on the Outlook section and how to fine tune it to make your life a little bit easier.
 Tasty starter tips
Once you’ve downloaded Outlook to your Android device, you’ll be asked to select the account from which you’d like to receive your emails. Setting this up is pain free, just enter in the email address and your password and let the app do the rest.
Once in, you will find that the inbox has been designed to be as readable and accessible as possible. The Focused section of the inbox includes messages that are most likely to be a priority – this is based on your usage history, among other things – so you can find them quickly.
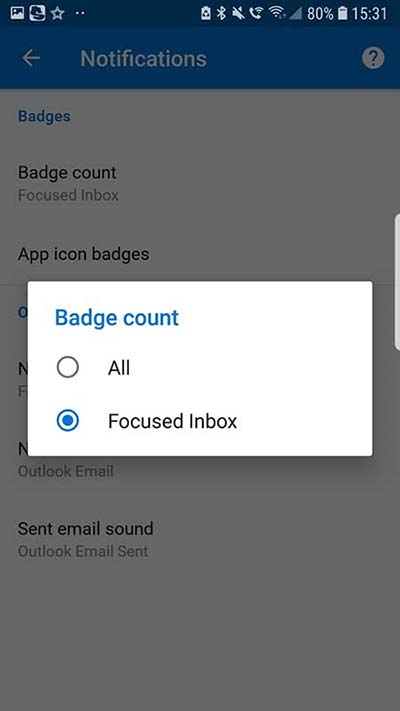
However, if the app got it wrong (and it can do this quite easily) you can access all your emails by tapping Other and then tapping on Get notified for all emails. This will take you to your notification settings where you can adjust your Badge count.
Now, you’re probably wondering what on Earth the Badge count actually is and why you should care.
The answer is wonderfully simple – Badge count includes your unread emails and your focused emails, how the app defines these will depend entirely on how you adjust your notification settings and how you use the app.
If you don’t want doing with a Focused inbox and the idea irritates you beyond belief, simply select All when you are in the notification settings and all your emails will appear together.
You can also adjust your notifications by tapping on the three lines in the top left-hand corner of the screen, then on the cogwheel icon on the bottom left, and then on Notifications>>Badge Count.
Swipe it right
Outlook for Android includes a very useful swipe feature that allows you to customise what happens when you swipe an email on your phone.
To access this feature, swipe to the right – not the left, this will archive your email on the standard settings – and you will immediately be presented with a customisation menu. Once in, you can adjust swipe right and swipe left to suit your personal preferences.
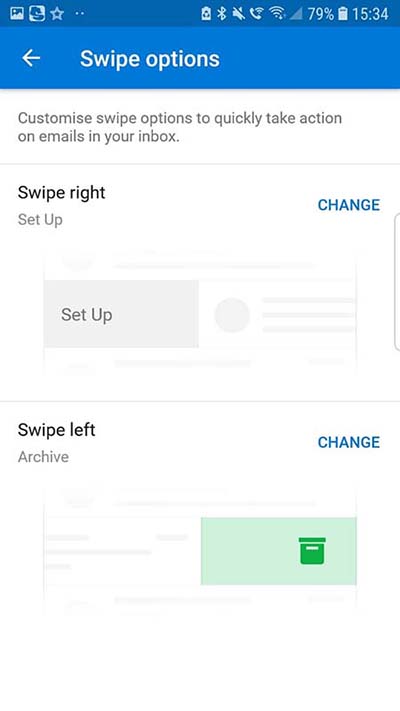 These can be customised to: Mark as read, Delete, Archive, Move to folder, Flag, Schedule, Read & archive, and None. To adjust these settings simply tap on Change next to the Swipe Right or Swipe Left notifications.
Another neat feature is the ability to add on @ mentions to your emails to make it easier to manage your emails and their priorities. When you type @[name] into an email, then that @ mention will appear in your inbox as bold copy and be clearly visible as part of the message summary.
This means that you can instantly see if you have had your name mentioned as an @ and you can see the @ mentions that form part of a reply to a series of emails. It’s as simple as writing the email and then typing out @ and then their name.
This will not only highlight it in the email, but it will automatically add their name to the To line in the email itself. It’s a super-fast way of prioritising a conversation and adding people to the email trail.
Group it, in the dark
Finally, you probably want to sort out your inbox so that navigating your copious contacts is quick and easy on your mobile device. To do so, tap on the three lines on the top left-hand side of your screen, then tap on the pencil icon to the right of Folders.
This will then open up a list of all your folders that include Inbox, Drafts, Deleted Items and more. Tap on the star to the left of the folder that you most frequently use and this will transform an otherwise mundane and sad folder into one of your special favourites.
You can do the same for Groups by tapping on your Group, then on the group’s details and then on the star. Boom, these emails and groups will be highlighted for easy access on your device. You can also drag and drop the different favourites into your preferred order to make your life a bit easier.
If you want to make your Outlook all dark and interesting, you can now take advantage of the new Dark Mode for Android Outlook. This is a pretty nifty setting that allows you to see more clearly in the dark and that, according to Microsoft, uses the true black palette to ease the strain on your eyes.
To access Dark Mode ensure that you have the latest update for Outlook – version 3.0.137 – and then tap on the three lines in the corner of the screen, then tap on the Settings cogwheel and scroll down to Preferences. Here you can simply turn Dark Mode on or off according to your mood, and eye strain. If you can’t see it right away, don’t worry, it is being slowly rolled out by Microsoft so some people may already have it while others don’t. Just be patient.